Docker Commands to Interact with Inside of Containers

Containers offer an isolated environment for running applications, but interacting with files, logs, and processes inside these environments can be challenging for beginners. Understanding how to manipulate a container's content is crucial for debugging, monitoring, and managing containerized applications efficiently.
In this section, we’ll cover the following topics:
- Why Do You Need Commands to Interact with Inside of Containers?
- How To Interact with Containers with CLI
- Case Study 1: Modifying an HTML File in an Nginx Server Container
- Case Study 2: Transferring Files to and From a Container
- Summary of Commands to Interact with Containers
Why Do You Need Commands to Interact with Inside of Containers?
Imagine you're working on a containerized project, and a critical bug arises in production. While controlling a container's lifecycle (e.g., starting, stopping, or restarting it) is straightforward, debugging and modifying its contents can feel less intuitive, especially for beginners. However, these capabilities are essential for effective container management.
For example, you might need to:
- Debug running applications: Access logs, explore file systems, or test commands directly within the container environment to identify and fix issues.
- Edit documents or configuration files inside the container: Fix a typo in an HTML file, update a configuration setting, or troubleshoot environment-specific problems without rebuilding the container.
- Verify changes in real-time: Modify files or settings and immediately test their effects, saving time and effort.
- Monitor processes: Identify resource-intensive or malfunctioning processes inside the container to ensure optimal performance.
- Transfer files: Add or retrieve project files, logs, or configuration data between the host and the container for updates or backups.
By mastering these commands, you can take control of containerized environments, resolve issues faster, and manage applications with confidence.
How To Interact with Containers with CLI
Interacting with running containers is a critical aspect of managing containerized environments. While lifecycle commands focus on starting, stopping, or restarting containers, interacting commands allow developers to delve deeper into a container’s inner workings. These commands enable debugging, monitoring, file manipulation, and real-time process management, making them invaluable for troubleshooting and maintaining containers in dynamic development and production environments.
1. Executing Commands in a Running Container
The docker exec command allows you to run commands or scripts inside an already running container, making it a vital tool for debugging or live updates.
docker exec
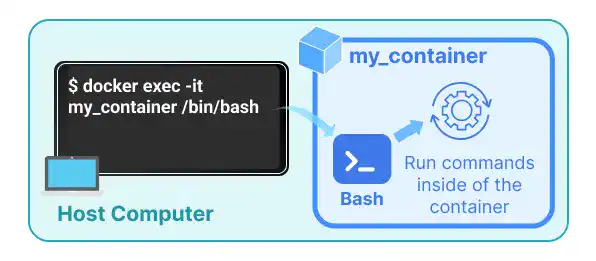
How it works:
Runs a new process inside the container without affecting the existing state.
Impact:
Ideal for maintenance, debugging, or testing commands in a live environment.
Command Syntax:
docker exec [options] <container_id_or_name> <command>
Explanation of Syntax:
-it: Opens an interactive terminal session.<command>: Specifies the command to execute.
Command Example:
docker exec -it my_container /bin/bash
Explanation of Example:
-it: Enables an interactive shell session./bin/bash: Opens a bash shell within the container.
2. Attaching to a Running Container
The docker attach command connects your terminal to an active container’s input, output, and error streams, enabling direct interaction with ongoing processes.
docker attach
How it works:
Lets you observe or control processes running inside the container.
Impact:
Helpful for monitoring or interacting with container processes in real time.
Command Syntax:
docker attach <container_id_or_name>
Command Example:
docker attach my_container
docker exec vs. docker attach
While docker exec and docker attach share the purpose of interacting with running containers, they differ in how they operate and impact the container, making it essential to understand their similarities and distinctions to choose the right tool for the task.
|
Aspect |
docker exec |
docker attach |
|
Isolation |
Creates a new process inside the container, leaving the main process unaffected. |
Directly connects to the container's primary process, potentially disrupting it. |
|
Control and Flexibility |
Allows running independent commands or starting a new shell within the container. |
Hooks into the existing standard input, output, and error streams of the container. |
|
Use Case |
Ideal for debugging, exploring, or executing commands without impacting the core application. |
Suitable for monitoring or interacting with the container’s main process but with higher risks. |
|
Detachment Safety |
Terminating the new process does not affect the container's primary application. |
Requires proper detachment ( |
|
Risk of Interference |
Low: New processes run independently of the container’s main workflow. |
High: Direct connection can unintentionally disrupt the container’s primary process. |
docker exec is the safer and more versatile approach for most scenarios, while docker attach is better for specific use cases where direct interaction with the primary process is necessary.
3. Viewing Logs from a Container
The docker logs command retrieves and displays the logs generated by the container’s applications, making it invaluable for debugging and monitoring.
docker logs
How it works:
Fetches real-time or historical logs without requiring you to access the container directly.
Impact:
Essential for understanding application behavior and diagnosing issues.
Command Syntax:
docker logs [options] <container_id_or_name>
Explanation of Syntax:
--tail: Displays the last N lines of logs.-f: Continuously streams logs in real time.
Command Example:
docker logs -f --tail 50 my_container
Explanation of Example:
-f: Follows log output in real time.--tail 50: Shows the last 50 lines of logs.
4. Monitoring Processes Inside a Container
The docker top command displays the list of active processes running inside a container, similar to the Linux top command.
docker top
How it works:
Provides detailed information on running processes, including their IDs, CPU, and memory usage.
Impact:
Helps identify resource-intensive or malfunctioning processes inside the container.
Command Syntax:
docker top <container_id_or_name>
Command Example:
docker top my_container
Explanation of Example:
Lists all processes running inside my_container to aid performance monitoring.
5. Copying Files Between Host and Container
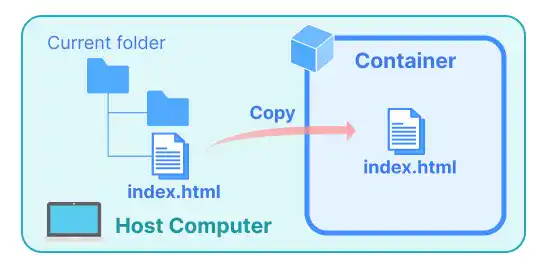
The docker cp command allows file or directory transfer between the host and the container, enabling quick updates or backups.
docker cp
How it works:
Copies files or directories from the host to the container or vice versa.
Impact:
Simplifies data management by enabling seamless file transfer.
Command Syntax:
docker cp <source_path> <container_id_or_name>:<destination_path>
Explanation of Syntax:
<source_path>: File or directory path on the host.<destination_path>: Target location inside the container.
Command Example:
docker cp index.html my_container:/usr/share/nginx/html/
Explanation of Example:
Transfers index.html to the /usr/share/nginx/html/ directory in my_container.
6. Checking File System Changes in a Container
The docker diff command displays changes made to the container’s filesystem since it started.
docker diff
How it works:
Lists added, modified, or deleted files within the container.
Impact:
Useful for understanding how the container's state evolves during runtime.
Command Syntax:
docker diff <container_id_or_name>
Command Example:
docker diff my_container
Example Output:
A /tmp/new_file
C /var/log/error.log
D /usr/share/nginx/html/index.html
Explanation of Output:
- A: Indicates that a file or directory has been added to the container's filesystem.
- C: Indicates that a file or directory has been changed (i.e., modified).
- D: Indicates that a file or directory has been deleted from the container's filesystem.
- B: This letter indicates that a block device (such as a mounted disk or volume) has been added or modified.
Case Study 1: Modifying an HTML File in an Nginx Server Container
In this case study, we will walk through how to use docker exec to modify a running container's content, specifically by editing an HTML file inside an Nginx web server container. This will give you hands-on experience with interacting with a container and making live changes.
Step 1: Setting Up the Nginx Container
To begin, we need to create and run an Nginx container. This container will host a web server, and we will access it to modify the HTML file it serves.
Run the following command in your terminal to start the container:
docker run -d --name nginx-container -p 8080:80 nginx
-d: Runs the container in the background (detached mode).--name nginx-container: Names the containernginx-container, making it easy to reference later.-p 8080:80: Maps port 8080 on your computer to port 80 on the container. This allows you to access the web server at http://localhost:8080.
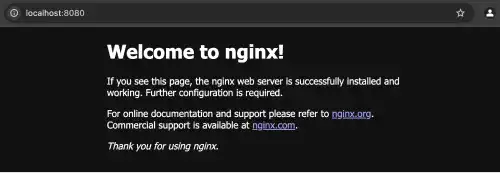
After running the command, the Nginx web server will be live, and you should be able to visit http://localhost:8080 in your web browser and see the default Nginx welcome page.
Step 2: Using docker exec to Access and Edit HTML Files
Next, we will use docker exec to enter the container and modify the default HTML file served by Nginx.
First, connect to the container’s shell with this command:
docker exec -it nginx-container /bin/bash
-it: Opens an interactive terminal inside the container.nginx-container: Refers to the name of the running container./bin/bash: Launches the Bash shell inside the container, so you can run commands as if you were logged directly into it.
Once inside the container, you’ll see a command prompt where you can navigate the file system and make changes.

Step 3: Navigating to the HTML Directory and Editing the File
Now, let’s go to the folder where the default HTML file is located. The default Nginx HTML files are stored in /usr/share/nginx/html. Use the following commands to navigate to this directory and edit the index.html file:
cd /usr/share/nginx/html
Next, open the index.html file using a text editor. Here, we’ll use vi, a basic text editor, to make changes:
vim index.html
Once the file is open, you can press i to enter insert mode, which allows you to edit the text. Change the contents of the HTML file (for example, modify the text "Welcome to Nginx!" to "Hello, Docker World!").
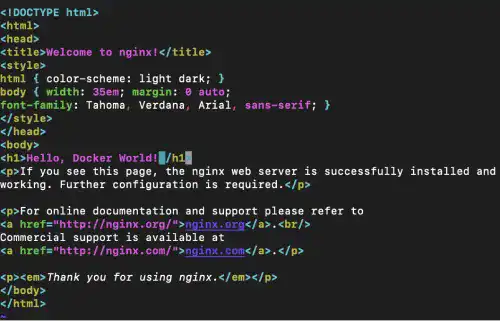
Then, press Esc to exit insert mode. To save and exit the editor, type :wq and press Enter.
If you want to master Vim operations, refer to our Linux Introduction Guide.
If vim is not available, try the nano editor.
nano index.html
- If it works, you can use it to edit the file.
- To save and exit
nano, pressCtrl+O, thenEnter, and finallyCtrl+X.
If neither vi nor nano is available, you can install one using the container's package manager. For example:
Debian/Ubuntu-based containers:
apt-get update && apt-get install -y vim
Alpine-based containers:
apk add vim
Step 4: Refreshing and Verifying Changes Inside the Container
Now that you’ve modified the index.html file, exit the container by typing:
exit
This will bring you back to your terminal.
Next, go back to your web browser and refresh the page at http://localhost:8080. You should now see the updated content you added to the index.html file, such as "Hello, Docker World!".
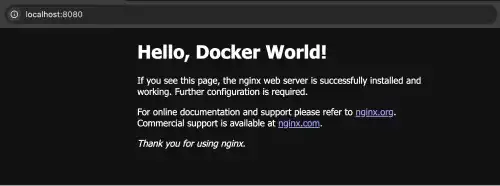
Summary of the Steps:
Step 1: Start the Nginx container with docker run.
Step 2: Use docker exec to enter the container’s shell.
Step 3: Navigate to the HTML directory and edit the index.html file using a text editor like vim.
Step 4: Exit the container and refresh the browser to see the changes.
This case study gives you a simple, practical way to interact with a running container and modify its contents. It also demonstrates how Docker enables you to quickly and safely make changes to containers without restarting them.
Case Study 2: Transferring Files to and From a Container
This case builds on the setup from Case Study 1, where an Nginx Docker container (nginx-container) is already running and serving files. Here, we will demonstrate how to use the docker cp command to transfer files between the host system and the container, enabling modifications and backups of container data.
Step 1: Setting Up the Project Folder on the Host
Before interacting with the container, organize your host environment by creating a dedicated project folder:
mkdir docker-cp-test
cd docker-cp-test
This creates a docker-project directory where all project-related files will be stored. Perform all subsequent file operations inside this folder for better organization.
Step 2: Copying a File Into the Container
a. Create an HTML File on the Host
Within the docker-cp-test folder, create a new HTML file:
echo "Docker Cp Command Test" > new_index.html
echo: Adds the text"Docker Cp Command Test"to a file.new_index.html: The name of the HTML file saved in your project folder.
Verify the file was created:
cat new_index.html
You should see the following output:
Docker Cp Command Test
b. Copy the File Into the Nginx Container
Transfer the new_index.html file from your host to the running Nginx container, overwriting the default index.html file:
docker cp new_index.html nginx-container:/usr/share/nginx/html/index.html
new_index.html: The file on the host.nginx-container:/usr/share/nginx/html/index.html: The destination path in the container.
c. Check the Output in the Browser
After copying the file, refresh your browser at http://localhost:8080 to verify the updated content is being served. You should now see the message "Hello, Docker World!".

Step 3: Copying a File From the Container
a. Retrieve the Updated File
Suppose you later modify the index.html file inside the container or want to back it up. You can copy the file back to your host system:
docker cp nginx-container:/usr/share/nginx/html/index.html ./retrieved_index.html
nginx-container:/usr/share/nginx/html/index.html: The source file in the container../retrieved_index.html: The destination file saved in your project folder on the host.
b. Verify the Retrieved File
Check the contents of the retrieved_index.html file to ensure it matches the expected content:
cat retrieved_index.html
The command line should return:
Docker Cp Command Test
Step 4: Cleaning Up the Docker Container and Image
When you are done with the container and no longer need the Nginx setup, follow these steps to clean up:
a. Stop and Remove the Container
Stop the Nginx container:
docker stop nginx-container
Remove the container:
docker rm nginx-container
b. Remove the Nginx Image
If you no longer need the Nginx image, remove it to free up disk space:
docker rmi nginx
Note: Ensure no other containers are using the Nginx image before removing it.
Summary of Steps
Step 1: Project Folder Setup: Organize files in a docker-project folder on the host.
Step 2: Copying to the Container: Create and copy an HTML file (new_index.html) to the container using docker cp.
Step 3: Copying From the Container: Retrieve the updated file (index.html) from the container using docker cp.
Step 4: Clean Up: Stop and remove the container with docker stop and docker rm, then remove the image with docker rmi.
Summary of Commands to Interact with Containers
The table below summarizes the key Docker commands used for interacting with containers. These commands are essential for tasks such as running commands inside containers, monitoring processes, managing logs, and transferring files.
|
Command |
Description |
|
|
Executes a command in a running container, allowing for real-time interactions. |
|
|
Attaches your terminal to a running container’s main process. |
|
|
Retrieves the logs of a running container for debugging and monitoring. |
|
|
Displays the processes running inside a container, similar to the |
|
|
Copies files between the host and a container, useful for updates and backups. |
|
|
Shows changes made to the container’s filesystem since it was started. |
For more detailed references, visit the official Docker CLI documentation.
FAQ: Docker Commands to Interact with Inside of Containers
Why do you need commands to interact with inside of containers?
Commands are essential for debugging, monitoring, and managing containerized applications. They allow you to access logs, edit files, verify changes, monitor processes, and transfer files, which are crucial for effective container management.
How can you interact with containers using the CLI?
Using commands like docker exec and docker attach, you can execute commands inside a running container or connect to its input/output streams. These commands help in debugging, monitoring, and real-time process management.
What is the difference between docker exec and docker attach?
docker exec creates a new process inside the container without affecting the main process, making it ideal for debugging. docker attach connects to the container's primary process, which can be riskier but useful for direct interaction.
How do you view logs from a container?
Use the docker logs command to retrieve and display logs generated by the container’s applications. This is essential for understanding application behavior and diagnosing issues.
How can you transfer files between the host and a container?
The docker cp command allows you to copy files or directories between the host and the container, facilitating quick updates or backups.