Setting Up Docker Environment

Docker is a game-changer for developers, enabling efficient application development through containerization. Whether you're new to Docker or enhancing your workflow, setting up a Docker environment is a crucial first step. This guide provides a detailed overview to help you get started on macOS and Windows, along with instructions for installing Docker Engine on Linux and optimizing your workflow with the VS Code Docker Extension.
In this section, we’ll cover the following topics:
- Installing Docker Desktop Across Platforms
- Installing Docker Engine on Linux
- Enhancing Your Workflow with the VS Code Docker Extension
Installing Docker Desktop
Docker Desktop simplifies container management, making it easier to build, share, and run containerized applications. Below is a guide to installing Docker Desktop on macOS and Windows.
Installing Docker Desktop on macOS
Installing Docker Desktop on macOS is a straightforward process. Follow these refined steps for a seamless setup:
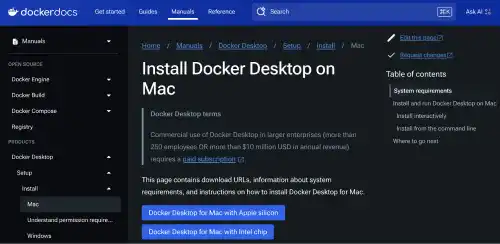
1. Download the Installer:
Visit the Docker Desktop download page and download the .dmg file specifically for macOS.
2. Run the Installer:
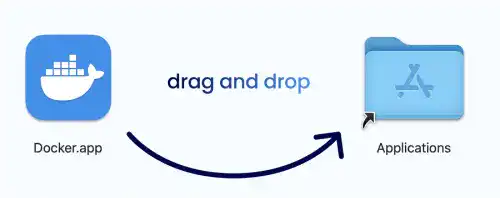
Open the downloaded .dmg file, then drag and drop the Docker icon into the Applications folder. Double-click the Docker icon in the Applications folder to launch it.
3. Grant Permissions:
During the installation process, you may be prompted to grant permissions for network and file access. These permissions are essential for Docker to function properly. Approve all requests as instructed.
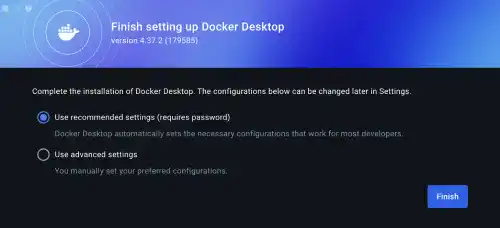
4. Select Recommended Settings:
When prompted, choose the “Use recommended settings” option to ensure optimal configuration for your system.
5. Sign In to Docker Hub:
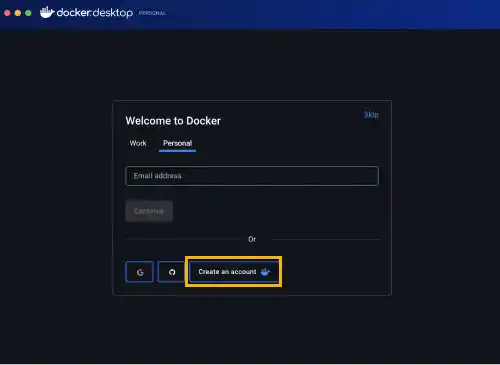
If you don’t already have a Docker Hub account, create one during this step. Use your credentials to log in when prompted by Docker Desktop.

6. Open Docker Desktop:
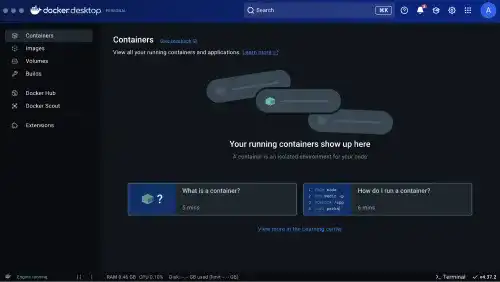
After signing in, open Docker Desktop from your Applications folder or the macOS dock. The Docker icon in the menu bar will indicate it is running.
7. Verify Docker Installation:
Once Docker Desktop is installed, the Docker CLI is also set up. Open the terminal and run the following command to confirm that Docker is installed and working correctly.
docker --version
When you run the command in the terminal, it will display the installed Docker version along with other details. Below is an example output.
Docker version 24.0.5, build ced0996
Installing Docker Desktop on Windows
Follow these steps to install Docker Desktop on Windows:
1. Enable WSL 2:
Docker relies on WSL (Windows Subsystem for Linux) to run Linux containers on Windows. WSL is a lightweight Linux environment that integrates seamlessly with Windows. WSL 2, the latest version, includes a real Linux kernel, enabling Docker to run containers efficiently without needing a traditional virtual machine. To enable WSL 2, open PowerShell as Administrator and run.
wsl --install
Restart your computer if prompted.
2. Download Docker Desktop:
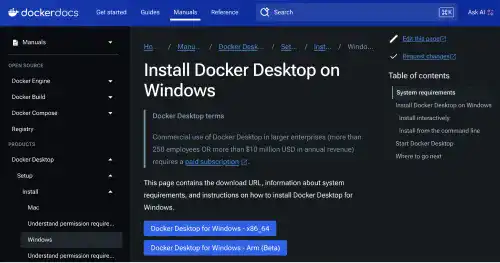
Go to the Docker Desktop page and download the Windows installer.
3. Run the Installer:
Execute the downloaded .exe file and follow the on-screen instructions.
4. Configure Docker Desktop:
During installation, ensure the "Use WSL 2 backend" option is enabled. Restart your computer if required.
5. Verify Installation:
Open PowerShell or Command Prompt and run.
docker --version
This command will confirm Docker is installed correctly by displaying the installed version number.
With WSL 2 and Docker Desktop, you can efficiently build and manage Linux containers on your Windows system, benefiting from a seamless integration of Linux and Windows tools.
Installing Docker Engine on Linux
If you’re using Linux, Docker Engine is the primary option for running containers. Unlike Docker Desktop, Docker Engine is a lightweight, command-line-based solution ideal for servers and non-GUI environments. However, when you install Docker Desktop on macOS or Windows, Docker Engine is included as part of the package.
Installing Docker Engine on Linux
Below is an example installation guide for Ubuntu, one of the most commonly used distributions. The installation process may differ for other Linux distributions.Refer to the official Docker documentation for installation guides for other distributions.
1. Set Up the Repository:
Add Docker’s official GPG key and set up the stable repository.
curl -fsSL https://download.docker.com/linux/ubuntu/gpg | sudo gpg --dearmor -o /usr/share/keyrings/docker-archive-keyring.gpg
echo "deb [arch=amd64 signed-by=/usr/share/keyrings/docker-archive-keyring.gpg] https://download.docker.com/linux/ubuntu $(lsb_release -cs) stable" | sudo tee /etc/apt/sources.list.d/docker.list > /dev/null
2. Install Docker Engine:
Update your package manager and install Docker Engine.
sudo apt update
sudo apt install docker-ce docker-ce-cli containerd.io
3. Start Docker:
Ensure the Docker service is running.
sudo systemctl start docker
4. Verify Installation:
Confirm Docker is installed by running.
docker --version
Example output
Docker version 24.0.5, build ced0996
5. (Optional) Add Your User to the Docker Group:
To run Docker commands without sudo, add your user to the Docker group.
sudo usermod -aG docker $USER
Log out and back in for the changes to take effect.
Enhancing Your Workflow with the VS Code Docker Extension
The VS Code Docker Extension integrates container management directly into your development environment, making it easier to manage Docker resources while coding. This extension is a powerful tool that enhances productivity and simplifies common Docker tasks.
Why Use the VS Code Docker Extension?
The extension provides several benefits:
- Streamlined Workflow: Manage containers and images directly from VS Code without switching to other tools.
- Integrated Debugging: Attach debuggers to running containers for real-time troubleshooting.
- Simplified Image Management: Build, pull, and push Docker images directly from your IDE.
- Compose Support: Manage multi-container Docker Compose setups efficiently.
Installing the VS Code Docker Extension
1. Open the Extensions Marketplace:
In VS Code, access the Extensions Marketplace from the left sidebar.
2. Search for "Docker":
Type "Docker" into the search bar and locate the official extension by Microsoft.
3. Install the Extension:
Click the "Install" button to add the extension to your VS Code environment.
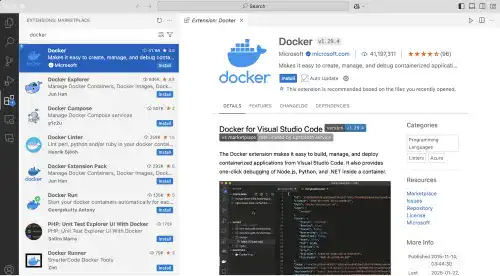
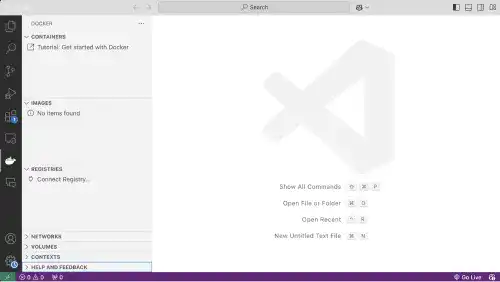
After installation, a Docker icon will appear in the left sidebar. Clicking this icon will display the statuses of your Docker containers, images, and other resources, providing a centralized view for managing your Docker environment.
Using the Extension
The Docker Extension provides an intuitive interface for tasks like:
- Starting, stopping, and managing containers.
- Building and managing images.
- Viewing logs and debugging containerized applications.
- Running and managing Docker Compose projects.
By integrating Docker management into your IDE, the VS Code Docker Extension saves time and improves efficiency, allowing you to focus on development.
Reference links:
FAQ: Setting Up Docker Environment
What is Docker Desktop and why is it important?
Docker Desktop is a tool that simplifies container management, making it easier to build, share, and run containerized applications on macOS and Windows. It is essential for developers to efficiently manage their Docker environments.
How do I install Docker Desktop on macOS?
To install Docker Desktop on macOS, download the .dmg file from the Docker website, run the installer, grant necessary permissions, select recommended settings, sign in to Docker Hub, and verify the installation via the terminal.
What is WSL 2 and why is it needed for Docker on Windows?
WSL 2 (Windows Subsystem for Linux) is a lightweight Linux environment that integrates with Windows, allowing Docker to run Linux containers efficiently without a traditional virtual machine. It is required for Docker Desktop on Windows.
How can I install Docker Engine on Linux?
To install Docker Engine on Linux, set up the Docker repository, install Docker Engine using your package manager, start the Docker service, and verify the installation. Optionally, add your user to the Docker group to run Docker commands without sudo.
What are the benefits of using the VS Code Docker Extension?
The VS Code Docker Extension streamlines workflow by allowing you to manage containers and images directly from VS Code, supports integrated debugging, simplifies image management, and efficiently handles Docker Compose setups.